Saturday, 11 May 2013

Pamper yourself without spending a big bucks

Taking care of your skin is definitely important, it is like brushing your teeth everyday, it needs additional care.  Having a good skin care regime will keep skin looking its best and it will prevent it from common skin problems such as acne, blemishes, signs of aging etc. I had a few skin problems once upon a time and I used too many products on my skin which irritated it even more.  So I eliminated a few products and stuck to the one's I have mentioned below and honestly it improved my skin over time.

Step 1: CLEANSE

Cleansing your skin twice a day (morning and at night) with a mild liquid cleanser.  I use a hand held brush like the Olay Pro-X Advanced Cleansing System with my Olay Pore Minimizing Cleanser and Scrub.  I find this product very refreshing on my skin and cleanse deeply and exfoliate my skin.


Step 2: TONER

Applying a toner removes any residue left behind after cleansing, and it leaves your skin revitalized.  I use the Body Shop Tea Tree Clearing Toner, this is also good for sensitive skin.


Step 3: MOISTURIZE

It's important to moisturize once a day, everyday, no matter what skin type you have to keep your skin hydrated.  For oily skin, it's best to use a oil free moisturizer so it won't clog your pores.  I use the Olay Fresh Long Live Moisture, I like this product because it has a satin finish so I don't find it greasy on my skin.


Step 4: SUNBLOCK

Protect your skin from the sun, use a sunscreen with an SPF 15 during the cold season and SPF 30 or up for the warm weather months to prevent anti-aging and discoloration.  I've been using the Neutrogena Age Shield Face SPF 55.


Step 5: EXFOLIATE

It's important to exfoliate twice a week to remove build up of dead skin cells allowing new cells to be exposed which will make your skin looking healthier.  I use the St. Ives Fresh Skin Apricot Scrub.  Again, this product nourishes my skin, and it helped my skin to have a clearer complexion and it's also affordable.


Step 6: REVITALIZE YOUR SKIN AT NIGHT

Applying a night cream with glycolic acid restores your skin and provides enough hydration while you sleep.  I've been using the Reversa Corrective Night Cream with 4% glycolic acid, this has been recommended to me by a professional esthetician.  This has exfoliating properties which reduces the appearance of brown spots.


Step 7: FACIAL TREATMENT

I think this is worth an investment in return of having a radiant and smoother complexion, and an even-toned skin.  Having a facial every 4-6 weeks helps remove toxins and dirt accumulated in your skin for weeks, months or years.  I regularly place a visit to Abby, an esthetician at Total Wrapture for an hour and a half of steaming and needle-based extractions.  It may seem painful but it's not as bad as it sounds, it's very relaxing since I know I'm in a good hands, thanks to her, my complexion is now better than ever.

Prone to Acne:

Like I mentioned earlier, I didn't have always the best skin and when I do get breakouts or scars from acne, the only trusted medications that I've been using for ages is Erythromycin and the other product that I just discovered is the Lanelle Cream for Acne.  I love these 2 products and I would recommended it to anyone if you can get your hands on it but the only problem is I purchased these overseas (Philippines).  When I do run low on these, I usually get my friends or relatives to send it to me, it may be quite expensive but it's the only products that worked and still is working for me.  When I do feel that a pimple is about to come out or if it has re-surface on my skin, I would apply one of these product and it won't be as irritating as it use to be, the redness has calm down in a day, and the next morning, it's all gone, that's how amazing it is.  


Although for the people that can't buy the products that I mentioned above and that are in a hunt for  an over the counter medication to treat an acne or brown spots, I consulted a professional (Abby) to suggest some active ingredients that you may want to look for.  Acne benzoyl peroxide, salycylic acid, alpha hydroxy acid (known as glycolic acid) and sulfur.

To lighten brown spots, you should look for something that has vitamin C, hydroquinone (not for pro-long use), tretinoin, arbutin and kojic acid.  She also suggested the Reversa Anti-spot Lightening Cream.


Overall, I've noticed amazing results using these steps and will continue in doing them to get a healthier looking skin.

However, if you have any suggestions or feedback in regards to skin care products that you may have used and found effective, please leave a comment below.

Sunday, 5 May 2013

My favs for the month of April

Hello again everyone, I'm back with another post, April just went by so fast, I can't believe it's already May! It's getting nicer and nicer outside, the sun is finally out!

For the month of April, I've accumulated a few favorite beauty products that I've been using and loving day to day.  We'll start with:

Foundations:
1. Top Left: MAC Studio Fix Fluid in NC35 - this is a medium to full coverage.  I use this product when I need to cover up a scar from an acne or blemishes as it is not as visible.

Top Right:  Marcelle BB Cream in Medium.  this is a light to medium coverage.  As we all know, BB creams is a moisturizer, primer and a foundation all in one, which I like if I'm in a rush and need to be out the door.  I usually apply this all over my face then mascara and I'm good to go.  Unlike some BB creams this has a thicker consistency and when it dries it gives a semi-matte finish and controls shine.

Middle: Neutrogena Healthy Skin in 70 Neutral Beige.  this is like a tinted moisturizer.  This gives me a dewy look, very light on my skin and it contains SPF20.


 Blush:

1. Top Left: Cream Blush: L'OREAL Visible Lift in 701 Rose Gold Lift.  I've posted a more detailed review on this.  Basically it gives my cheeks a tint of color with a little bit of shimmer but it is not too over powering.

2. Middle: Powder Blush: Sheriff Professional in 306 Look at Me.  This may look vibrant in the pan but it appears the opposite.  It's a subtle shade more like a bubble gum pink.

3. Bottom: Mineral Blush: The Body Shop in 02 Golden Terracotta.  This is best for sensitive skin, This is like a coral/dark orange finish.  it also creates a natural looking flush of color with shimmer.

Here's a few swatches of the blushes:

The Body Shop Mineral Blush in Golden Terracotta

Sheriff Professional in 306 Look at Me


On my cheeks is the 306 Look at Me


 Bronzer and Contour:

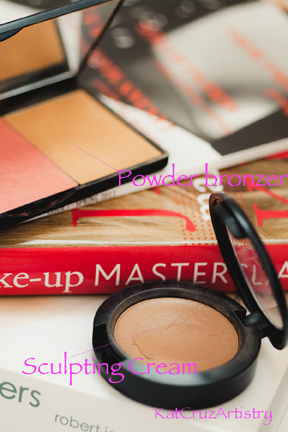
1. Top Left: Charlotte Ronson 3x a Charm in Shoshanna - This is a nice bronzer, there's not that much shimmer, it's more of a matte finish.  This suits medium-dark skin tone. This bronzer gives a sun-kissed look when blended nicely.  To apply a bronzer, you just want to place it where the sun hits your face so that will be on the cheek bones, temples and on your nose.  Since this comes with a blush and a highlighter, the blush is a peachy, coral finish, very pigmented so you don't need as much and just blend, blend, and blend.  The highlighter I don't use at all because I find it chalky.

2. Bottom: MAC Pro Sculpting Cream in Pure Sculpture.   This is a soft tan brown.  This product provides a natural-defined contour.  I use this on the hollows of my cheeks to create the illusion of a slimmer face and on my crease for extra dimension.


Charlotte Ronson in Shoshanna (Bronzer
MAC Pure Sculpture

On my cheeks is the Charlotte Ronson Bronzer in Shoshanna


Eyeshadows/Eyeliner

Here are my top 3 eyeshadows that I've been liking for a natural day time, summery look:

1. Top Left: MAC Pressed Pigment in Beaming - Soft brown with shimmer, I apply this with a MAC 239 Brush and spray it with a MAC Fix Plus and dab it on my lids and it gives a glossy effect. 

2. Top Right corner: MAC Paint Pot in Rubenesque - Gold/Peachy cream finish.

3. L'Oreal Color Infaillible in 034 Pepsy Coral - Nice Peachy/Coral with Gold luminosity with a smooth-velvety finish.

4. Lise Watier Eyeliner in Vert Sarcelle - A deep Teal Green eyeliner.  The texture is soft which makes it easy to blend, it glides smoothly as well.  This is a great pop of color to your eyes.


Lise Watier in Vert Sarcelle


Mascara:

1. Rimmel Scandaleyes Volume Mascara in 003 Extreme Black
As I said before, I'm not born with long, thick eye lashes but with this mascara , it separates my lashes and it adds volume.


 Lips:

All of these lip products are perfect for an everyday look, they're all moisturizing on the lips.  I usually apply a gloss on top to make it last longer.  But the texture is smooth and creamy.

1. Top: Maybelline Color Whisper in Pin up Peach, I like to pair it with MAC Lipglass in Enchantress.

2. Middle: MAC Amplified in Half and Half, I like to pair it with Sally Hansen in Sparkling Nude.
3. Bottom: Revlon Color Burst Lip Butter in Lollipop.


Photo on your left: I'm wearing the Maybelline Color Whisper in Pin up Peach with MAC Enchantress.


Face Brushes:

All of these brushes are soft and it buffs well on your skin to give a flawless finish.  This can be use for liquid, cream and powder foundations, blush and bronzers.

1. Left: Real Techniques Buffing Brush

2. Middle: PUR Minerals Chisel Brush

3. Right: Coming Soon GlamChix Fan Brush


Eyebrushes:

1. Left: Sigma Precision Round P82 - I use this for cream eyeshadows and sometimes concealers.

2. Middle: MAC 239 Brush - I use this for powder eyeshadows and pigments.

3. Right: Sigma E25 - I use this to apply eyeshadows or for blending.


Hair:

L'Oreal Elnett Satin Styling Heat Protection for Straight hair, it says it protects from heat damage up to 230 degrees.  It has a light-fresh scent which I like.


Must Read:

1. Jemma Kidd Make-up Masterclass - basically talks about all aspects of skincare and makeup, different application techniques for natural day time look to evening look for age appropriate.

2. Makeup Makeover Beauty Bible - transformation on different women enhancing their beauty.

3. 1968 Magazine Spring 2013 - Inspirations on creating edgy look, it's more for photoshoots.

Sunday, 28 April 2013

Creating a polished look

Hi everyone,

It's been a while since my last post, I've been busy with a few photoshoots and my business partner and I are coming up with a makeup brush line etc... which we're both excited for.

Anyway, today I decided to do more of a step by step makeup look, this is good for daytime like lunch meetings, for work, weekend gatherings etc.  Hope you guys enjoy.


STEP 1: Excuse the photo, this is me without any makeup (before shot), since this is somewhat a tutorial, it's better that I show you in detail of how I do my makeup from beginning to end.  So in this step, I apply a toner first, I use the the Bodyshop Tea Tree Skin Clearing Toner, this is good for blemished skin.  then I moisturize with Olay Long Live Moisture. Since I have an oily skin, I use a primer and the one I'm loving at the moment is the Almay Smart Shade Perfect and Correct Primer, besides the fact that it evens out skin tone it also reduce redness.


STEP 2: I apply my liquid foundation with my PUR Minerals Chisel brush, for this look I use Mac Select Foundation in NC35. 


STEP 3: After applying my foundation, I use a eye brightener for my dark circles, which is the Maybelline Instant Age Rewind Eraser Dark Circles, since it's a brightener, the color has pink in it. then I let that set for a few seconds then I layered it with the Maybelline Instant Age Rewind Eraser Dark Circles in 30 Medium.  For any blemishes on my skin, redness around my nose, I use the Mac Studio Finish Concealer in NW25.  For all these products, I use the Elf All over Eyeshadow brush because it's quite dense but soft which is good for blending.


STEP 4: Below is a photo that shows you how I applied my eyeshadow, the palette I use is the Nudes StudioMakeup what I like about this palette is it comes with an eye primer.  So on the photo below marked as step 1, I primed my lids with the StudioMakeup primer then with an Elf eyeshadow "C" brush I applied the 6th eyeshadow shade from your left (on the photo, it's marked as shade 1) it's like a bronzy, golden brown if you find that this shade  too dark on you, you can use the 3rd eyeshadow from your left (marked on the photo as shade 2), it's like a coppery brown. Then I took my blending brush, Sigma Tapered Blending in E35 to blend any harsh lines.

On the photo, marked step 2, I lined my upper lash line with Mac Smolder, or you can use any black eye liner and smudge it with the eyeshadow brush to have a softer, smoky finish.  

Lastly, on the photo marked  as step 3, I applied the Mac pigment in Rose Gold just in the middle of my  eye lid to create definition.


STEP 5: To define my eyebrows, I use the Joe Brow Powder in Auburn using an Angle brush like the Confidential Angle Brush, if you find that your eyebrows is just all over the place or quite sparse, you can apply a clear brow gel to set it.  For Mascara on my upper lashes, I use the Rimmel Scandal Eyes in 003 Extreme Black, I'm not blessed with long, thick lashes but this mascara really adds volume.  and on my lower lashes, I use the Clinique Bottom Lash Mascara, I love this product as it grasp the tiniest bottom lashes and it doesn't smear at all.


STEP 6: The finish look, I powdered my skin with Mac Mineralize Skin Finish Natural in Medium Plus using the Real Techniques Multi Task Brush, on my cheeks using the same brush, I use Sheriff Professional in 309 Playful (www.sheriffcosmetics.com), as for my lips, I use Mac Pro LongWear lip liner in More to Love ( I think this is a limited edition), you can use any Fuscia, or Rasberry lip liner, and I layered it with the Maybelline Lipstick in 115 Pink Quartz.

I hope this tutorial gave you some idea of how to apply makeup or just to try something new.